

A Panel Is Half the Job: Spec the System
A panel on its own is half a job. This page covers what goes with it: adhesive, trims, clips and screws - everything a fitter needs to get the wall up and get off site. One supplier for the sheet and the system means one shipment, one set of documents and no running around for trim on the morning of the job.
Three Fixing Methods: Adhesive, Z-Clip, Direct Screw
You do not need three methods. You need the one that matches the substrate and the spec. Here is when to use what.
Method 1: Construction Adhesive. Solvent-free hybrid polymer. One cartridge covers 2.4 sqm. Vertical beads at 200-250mm spacing, with horizontal beads at the top and bottom edges and nothing in the middle - the panel needs to breathe. Cures in 24 hours. The most common method for permanent installations. When: drywall substrate, no future removal planned, fastest on large runs.

Method 2: Z-Clip System. Aluminium interlocking rail - one rail screwed to the wall, the other pre-fixed to the back of the panel. Panels clip on and off without tools. The rail leaves a 12mm air gap behind the panel, which boosts NRC by 0.15-0.20 against direct mount. When: office fit-outs that get reconfigured, walls that need access behind the panels, and specs that call for air-gap performance.
Method 3: Direct Screw. Black countersunk screws through the felt gap between slats, concealed by the black backing. The fastest mechanical fix - no cure time. When: stud walls and timber battens, jobs where the fitter cannot wait for adhesive to cure, and hospitality where install is permanent and turnaround is tight.
What the Wall Is Made Of Matters
Not every wall takes adhesive. Not every wall holds a screw. Before the first panel goes up, check what is behind the paint.

Drywall and plasterboard: adhesive works, screws into studs work, Z-clip works - the most forgiving substrate. Flatness must be within 2mm over 2 metres; if it is not, batten first.
Brick and block: adhesive works if the surface is sealed and flat. Uneven or unpainted brick gets a timber batten grid first. Never glue directly onto bare brick - raw brick draws moisture out of the adhesive.
Stud wall and timber frame: direct screw into the studs at 600mm centres. The 600mm sheet width lines up with standard stud spacing, so no adhesive is needed - the fastest of the three.
Renovation over tiles, wallpaper or textured finish: do not. Strip it. Adhesive bonds to the substrate, not to the old surface layer. A panel that falls off a tiled bathroom wall is a callback, every time.
Trim: What Makes a Job Look Spec'd, Not DIY
A wall without trim looks like a DIY weekend. A wall with trim looks like a spec job. Every panel installation needs at minimum an end cap and a floor trim.

The profiles: PVC internal corner where two panel walls meet at 90 degrees; PVC external corner where panels wrap a pillar; end cap U-channel for exposed vertical edges; H-joint connector when a wall runs longer than 2400mm; and an L-angle floor trim that covers the 5mm expansion gap and stops cleaning water wicking into the felt backing.
PVC for budget builds; aluminium for high-traffic commercial spaces where trims take knocks from trolleys and vacuums. Both are colour-matched to the panel veneer - oak trim for oak sheets, walnut for walnut.
The Four-Step Pre-Install Checklist
A fitter who skips these four steps generates a callback. Every time.
1. Acclimatise the sheets. 48 hours minimum in the room they are going into. Stack them flat, never on edge. MDF moves - a sheet that bows 2mm overnight will not sit flat on the wall.
2. Check the wall with a 2-metre straight edge. Anything beyond 2mm deviation gets battened. Adhesive will not bridge a 4mm dip; the panel will bridge it for about three weeks, then pop off when the sun hits.
3. Plan the layout from the door. The eye catches the cut line first, so start from the most visible corner and work away from it. The last sheet goes where nobody looks.
4. Mark horizontal lines at 600mm centres. Adhesive is spec'd as vertical beads at 200-250mm plus top and bottom edge beads - no adhesive in the middle of the panel.

Fitter's tool kit: 2-metre straight edge, spirit level, caulking gun for adhesive cartridges, rubber mallet, sharp utility knife for trim cuts, tape measure, pencil, cordless drill when screwing.
NRC With and Without the Air Gap
Fixing method changes the acoustic number. Direct-mounted, the 21mm slat panel gives NRC 0.50-0.60. On the Z-clip rail the 12mm air gap behind the panel adds 0.15-0.20, taking a typical install to roughly 0.65-0.80. Where the brief demands more, build the 45mm cavity with mineral wool for 0.85-0.95 - the studio spec.
The rule of thumb: if the spec sheet quotes an NRC target, tell us the fixing method and the cavity depth at enquiry. The number we quote will match the install, not the marketing.
The System Spec Summary
Panel and system components, in one table:
| Component | Spec |
|---|---|
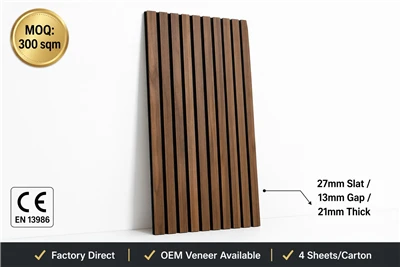
| Panel | 2400 x 600 x 21mm. 27mm slat / 13mm gap / 9mm PET felt backing. CE EN 13986. |
| Adhesive | Solvent-free hybrid polymer. 1 cartridge per 2.4 sqm. Vertical beads at 200-250mm spacing. |
| Z-Clip | Aluminium interlocking rail. 12mm air gap. Pre-fixed or site-fixed. NRC +0.15-0.20. |
| Screws | Black finish, countersunk. Concealed in the PET felt gap. |
| Trims (PVC) | Internal corner / External corner / End cap U / H-joint / L-angle floor. Colour-matched. |
| Trims (Aluminium) | Same profiles. High-traffic commercial grade. |
| MOQ (Panel) | 300 sqm per grade, per colour. |
| MOQ (Trim) | Shipped with the panel order. Bulk trim stock available for repeat contractors. |
Compliance: CE Certification
The panel is CE certified to EN 13986:2004+A1:2015 under certificate SC-PSC-4-2026-06-53, issued by Certification Center LTD, Riga, Latvia - an EU notified body.
Accessories and Spares for Repeat Contractors
Contractors running repeat jobs order panels and trim separately: bulk trim stock is available so the second site never waits on the first site's leftovers. Edge trims get knocked and need replacing; H-joints get specified when room dimensions change between rounds. Keep the panel order at 300 sqm per grade, per colour and add trim quantities from the reflected plan - we will match both to the same veneer batch so colour stays consistent across deliveries.
FAQ
What does an acoustic wall panel system include? +
The panel plus everything needed to install it: solvent-free hybrid polymer adhesive, aluminium Z-clip rails, black screws, and the trim set (internal and external corners, end cap U, H-joint, L-angle floor trim). Trims ship with the panel order, colour-matched to the veneer.
What adhesive should be used for acoustic panels? +
A solvent-free hybrid polymer adhesive - one cartridge per 2.4 sqm. Apply as vertical beads at 200-250mm spacing plus horizontal beads at the top and bottom edges, with nothing in the middle so the panel can breathe. Cures in 24 hours. Never use adhesive alone on ceilings.
Can acoustic panels be fixed to brick or over tiles? +
Sealed, flat brick takes adhesive; uneven or bare brick gets a timber batten grid first - raw brick draws moisture out of the adhesive. Never fix over tiles, wallpaper or textured finishes: strip them first. Adhesive bonds to the substrate, not to the old surface layer.
What is the acoustic benefit of the Z-clip air gap? +
The aluminium rail holds panels 12mm off the wall, adding NRC 0.15-0.20 over direct mount - roughly 0.65-0.80 on a typical install. Panels clip on and off without tools, so the same system suits reconfigurable offices and walls that need service access.
How are the screws hidden? +
Direct screw fixing goes through the black PET felt gap between the 27mm slats. The screws are black and countersunk, so they disappear into the dark gap between slats - no visible fixing points on the veneer face.
Which trims do I need for a slat wall? +
Minimum: an end cap U-channel for exposed vertical edges and an L-angle floor trim for the expansion gap. Add internal and external corner profiles for 90-degree returns and pillars, and an H-joint connector when the wall exceeds 2400mm. PVC for budget, aluminium for high-traffic areas.
Why do acoustic panels fall off walls? +
Almost always one of three: adhesive applied over tiles or wallpaper instead of a stripped substrate; adhesive expected to bridge an out-of-flat wall (over 2mm in 2 metres); or sheets installed without 48 hours of acclimatisation so the MDF moves after fixing. Substrate preparation prevents all three.
What is the MOQ for panels and trim? +
Panel MOQ is 300 sqm per grade, per colour. Trims ship with the panel order, and bulk trim stock is available for repeat contractors so the second site never waits on leftovers. Panels and trims are matched to the same veneer batch.
About the Author
Written by J. Mao, Export Manager at Hangzhou Eastopo New Materials Technology Co., Ltd. J. Mao leads export specification for acoustic panel systems across the UK, EU, US, Australia and New Zealand, and works with fitters and contractors on substrate and fixing questions daily. Contact: mj@eastopo.com | WhatsApp +86 193 5725 8106
Send Us the Wall. We'll Send the System.
Tell us the wall dimensions. The substrate. How many sheets you need. Whether you want adhesive, trim and clips with the order. We will quote the system - not just the panel. One shipment. One supplier. No running around for trim on the morning of the job. Lead time is 15-35 days depending on veneer and batch size, quoted against the production schedule at order.
Hot Tags: acoustic wall panel system, acoustic panel adhesive, acoustic panel z-clip, acoustic panel trim, acoustic slat panel installation, acoustic panel accessories, Acoustic Panel For Restaurants, Decorative Acoustic Sound Panel, Felt Acoustic Ceiling Panel, Acoustic Moss Wall Panel, Acoustic Screen Panel, Acoustic Panel For Auditorium